

Try this wonderfully flavoursome Medovik honey cake from MasterChef's Larissa Sewell for a show-stopping dessert at Christmas.
December 14, 2023
Recipes
Larissa’s Medovik honey cake
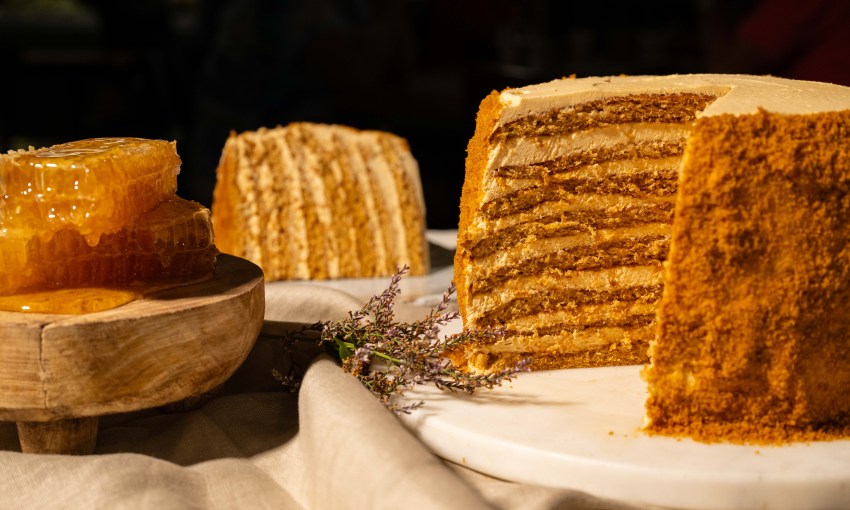
The Adelaide Central Market has collaborated with MasterChef Australia 2023 contestant Larissa Sewell to celebrate Christmas in style, and using locally-sourced honey, this is one of Larissa’s favourites.
Larissa says that growing up in a Slavic household; every family gathering, or celebration revolved around food – and one of the most eagerly-anticipated staples for every occasion was Medovik – a rich, layered honey cake. “Every single aunt, her neighbour, friend from church and sister-in-law had their own secret recipe, and sometimes, family events felt like more of a bake-off; and had us all rolling home afterwards,” Larissa says.
“I’d love to tell you that this recipe is my secret, heirloom family recipe, passed down through the generations of strong Slavic women – and now bestowed upon me for my safekeeping, but no. Just when I thought you couldn’t improve on perfection – I tried this Medovik recipe that changed my life. With its burnt honey and lashings of dulce de leche, this recipe is a twist in the traditional – based on Michelle Polzine’s ‘20th Century Cafe’ recipe in San Francisco – with a few tweaks and twists to make it my own.”
For the burnt honey
3/4 cup honey
1/4 cup water
Cake layers
465g plain flour, sifted
2.5 teaspoons baking soda
200g butter, cubed
200g caster sugar
7 large eggs
1 teaspoon vanilla extract
1 teaspoon salt
1.5 teaspoons cinnamon
1/4 cup burnt honey
3/4 cup honey
Frosting
1/2 cup burnt honey
395g Dulce de Leche – you can substitute with Top’n’Fill Caramel from a tin
1 litre + 1 cup of cream
1/2 tsp fine sea salt
To make the burnt honey:
Bring 3/4 cup of honey to a simmer on the stovetop over a medium heat. Continue to simmer, stirring occasionally, until the honey is a deep amber colour and smells caramelly and delicious – this usually takes around 5 minutes.
Once the honey is a deep amber, remove from heat and carefully add 1/4 cup of room temperature water, this will help ensure the burnt honey remains a pourable consistency. Whisk well to combine and set aside to cool.
For the cake layers:
Preheat your oven to 180°C (350°F)
Draw out 11 x 8-inch rounds on baking paper. I usually do this by tracing my cake tin with a pencil on baking paper (just remember to flip the paper over so that the pencil is not on the cake side) I then like to trim the baking paper into circles, just slightly bigger than my rounds – this helps me to fit more on each baking tray and makes it a little easier to handle each cake layer once baked.
Quarter-fill a medium saucepan with water and bring to a simmer. Meanwhile, In a large glass, heatproof mixing bowl combine 1/4 cup burnt honey, 3/4 cup regular honey, butter, vanilla extract and sugar in a large bowl, and place over the simmering water as a ‘double boiler’ – be careful that the bowl doesn’t touch the water. Gently Stir occasionally until the butter is completely melted and whisk well to combine.
Crack your eggs into a bowl and set aside. In another small bowl, mix salt, cinnamon, and baking soda.
When the butter and honey mixture is warm to the touch, add your eggs whilst whisking constantly so everything combines well. Continue to whisk gently until the mixture is warm to the touch again, and then add the cinnamon and baking soda mixture. Continue to whisk for a minute or so. The batter will become quite billowy – and at this point, you can remove the bowl and leave to cool down very slightly.
Place the flour in a fine mesh sieve and slowly incorporate the flour into the mixture until smooth. You can place the bowl back on the simmering saucepan on the lowest heat – so that the batter keeps just warm – you don’t want this batter to cool completely.
Spoon around 1/3 of a cup of batter on each of your baking paper rounds, pushing the batter right to the edges, and making sure that the batter is an even consistency over the round. You can add a drop or two more batter to any parts that might need ‘filling’ – repeat this step until you have 11 rounds of batter layers.
Bake in the preheated oven for around 5 minutes or until a skewer inserted into the centre comes out clean, the layer should be thin, and a little spongey when cooked – it should bounce back a little when you touch it. Important to not over-bake.
Remove the layers from the parchment paper before completely cool and leave on a wire rack to cool completely.
Reduce the oven temperature to 120 degrees Celsius. Once the cake layers are completely cool, you can use pair of scissors to trim off any ends that might have crept out of your 8 inch circles and set aside your least attractive layer – these trimmings and spare round should be spread out on a baking sheet and toasted in the oven for 5-10 mins, watching carefully, until a deep red-brown colour and dry. Allow to cool completely, and then crush to a fine sand – I usually whizz this up in my blender. This will be your cake crumb.
To make the frosting:
To a chilled bowl, add 1/2 cup burnt honey, 395g dulce de leche, and 1/2 tsp of fine salt. Whisk together, and then add a cup of cold cream and mix until completely combined. Set this aside in the fridge to chill completely – around 30 mins.
Pour the remainder of the cream into a cold bowl – ideally, a stand mixer with a whisk attachment; and whisk until you have soft peaks. Once your cream is at the soft peaks stage, add the honey mixture and whip to medium-stiff peaks.
Assemble
Take a 3/4 cup and use it scoop cream on to the centre of each layer of cake. Spread evenly, allowing a border of around 2-3cm from the edge of the cake rounds – as the cream will spread further under the layers of cake. Continue to alternate layer and cream until you have used all of the cake layers. Use the remaining cream frosting on top, and around the sides of the cake. The sides of the cake don’t need to be entirely covered, as you’ll be crumbing the edges.
Use your hands to spread the crumb over the sides of the cake. Traditionally, Medovik has all sides and top crumbed, but I usually leave the top clean.
Chill the cake in the refrigerator for at least 4 hours or overnight to allow the flavours to meld.
Tips:
This cake is extremely simple to make, however, can take some time because of the number of layers and steps. The cake layers can be made in advance and even frozen if needed – just defrost before using.
Medovik is even better once it’s had time for all the cream to mingle with the layers – this is the perfect cake to make a couple of days in advance.
The cream frosting on this cake is rich and luxe – feel free to substitute some of the cream with equivalent amount of sour cream – no more than a cup. It provides a lovely tartness that helps cut through the sweet, delicious cake.
Subscribe Today!
Subscribe to South Australia's biggest-selling magazine, showcasing the best of Adelaide and South Australia. $143 per year with free delivery to your door.
Share —